
Did you know that you can host your own email server with Mailcow and use the same OpenPGP.js libraries maintained by ProtonMail to exchange emails securely using PGP encryption? We are huge fans of ProtonMail, and we even use it for our company email, but some organizations simply require a self-hosted email server that they can host on their custom architected infrastructure.
Mailcow is a self-hosted email server that comprises of a complete stack of services distributed as Docker containers, including Postfix, Dovecot, and Rspamd – practically everything you need to run your own email server for a custom domain. In another article, we covered how to sign and encrypt emails with a S/MIME certificate using Outlook or Thunderbird with a Mailcow mail server. It is preferable to use S/MIME with a desktop client, because although a PKCS #12 certificate can be uploaded to the SOGo webmail interface bundled with Mailcow, it significantly weakens the security by saving the private key on the server. The benefit of course, is that you can sign and decrypt S/MIME messages when you login from any browser, but for most users of encrypted email, it is not worth the security trade-off.
With OpenPGP.js, the generated PGP keypair and any imported PGP keys are persisted locally in the browser’s storage – not uploaded to the server. The JavaScript library relies on the crypto functions of modern web browsers including Chrome, Edge, Firefox, and Safari to get the sufficient entropy needed to generate a cryptographically secure PGP key. Using your passphrase, you may export your keys at any time to sign, encrypt, and decrypt PGP messages using a different browser, or a desktop mail client.
SOGo supports the S/MIME standard for email encryption only, but not PGP. To use PGP (Pretty Good Privacy) for email encryption with Mailcow, it’s necessary to install a separate webmail client called Afterlogic WebMail PHP Lite. Afterlogic WebMail uses the OpenPGP.js library for the management of PGP keys, signing, encryption, and decryption of email in the web browser.
Integrating Afterlogic WebMail with Mailcow
The easiest way to deploy Afterlogic WebMail is on a separate virtual server in the same datacenter as your Mailcow email server. Although Afterlogic can be installed in the same server as Mailcow, it would require modifying the configuration file running in the Nginx container of the Mailcow Docker stack.
Afterlogic WebMail PHP Lite 8 requires a LAMP or LEMP server with the following PHP modules, and at least PHP version 5.6. We recommend using a newer PHP version, such as PHP 7.2, as any branch 7.1 or earlier will have reached security end of life by December 2019.
php-common php-mysqlnd php-pdo php-curl php-mbstring php-openssl php-dom php-json php-session
If using a RHEL-based Linux distribution such as CentOS with SELinux in enforcing mode, it also requires setting the contexts correctly for the Afterlogic data directory which the web server user will require read/write access to. For example, if you moved the data folder one level above the webroot (from /var/www/lite/data/ to /var/www/data/), you would need to set the SELinux contexts as follows:
sudo semanage fcontext -a -t httpd_sys_content_t "/var/www(/.*)?"
sudo semanage fcontext -a -t httpd_sys_rw_content_t "/var/www(/.*)?"
sudo restorecon -Rv
As well, the data directory and Afterlogic files should be owned by the web server user and group, which is apache:apache for Apache on RHEL-based distributions (process name is httpd), www-data:www-data for Apache on Debian-based distributions (process name is apache2), and nginx:nginx on any platform using Nginx and PHP-FPM.
Assuming you are using a MySQL/MariaDB server listening on localhost, you also need to allow Apache or PHP-FPM (if using Nginx) to connect to the MySQL database.
sudo setsebool -P httpd_can_network_connect_db 1
To check whether all the configuration requirements have been met for installing Afterlogic after you have edited data/settings/config.json from the command line, navigate to the domain or subdomain of your web server and append ?install to the end of the URL. Note that the superadmin password cannot be set from the config.json file, and must be set after logging into the Afterlogic dashboard for the first time using a blank password.
To integrate your Mailcow server with Afterlogic WebMail, sign in as superadmin and select Mail Servers from the navigation menu. Then click Add New Server to associate your Mailcow server with Afterlogic.
In the Domains field, you should specify the part of the email address to the right hand side of the @ symbol. Then for IMAP server and SMTP server, specify your Mailcow server’s address such as mail.example.com. The IMAP port should be 993 and the SMTP port should be 465, with the SSL checkbox selected for both. Also, under SMTP authentication, ensure the radio button for Use incoming mail’s login/password of the user is selected.
Also, ensure the checkboxes for Use mail threading if supported by the server and Use full email address as login are selected. When finished, click the Save button at the bottom of the page.
Enabling OpenPGP & Generating a PGP Key with Afterlogic WebMail
Once the integration between Afterlogic WebMail and Mailcow is successfully configured, you can sign in to Afterlogic’s webmail interface using the username and password you’ve setup on Mailcow.
Afterlogic supports either importing an existing PGP key, or generating a new PGP key in the browser. Either way, the PGP private key is not uploaded to the server where Afterlogic is hosted, because the key generation and storage happens locally in your browser – thanks to OpenPGP.js. For this article, we assume that you don’t have a PGP key yet and need to generate one.
Sign into Afterlogic WebMail, then click Settings in the top right hand corner. Then select OpenPGP from the left navigation menu. Check Enable OpenPGP, then click Generate New Key, after which a modal window will pop up asking you to specify a password (passphrase) and the desired key length, which can either be 2048 or 4096 bits. Click Generate to generate the keypair and save it to your browser storage.
 After the keypair is generated, it will appear in the list of Public keys and Private keys like this. Any future public keys which you import from other users will also appear in the list below. You can import any PGP key block (public or private) by clicking on the Import key option from this screen and copy and pasting it into the pop up modal window.
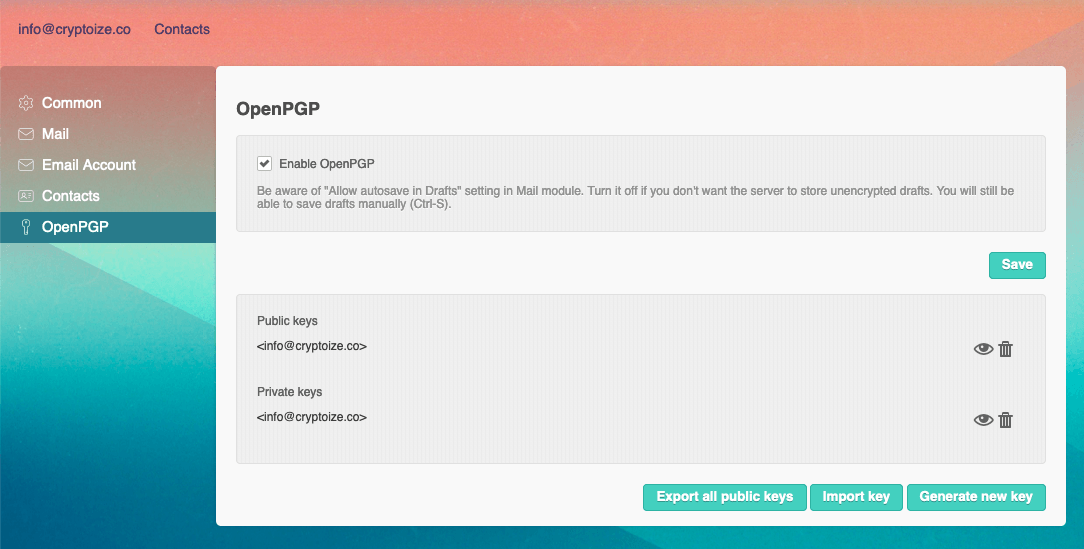 IMPORTANT: In case your browser storage is cleared, we recommend exporting both the public and private key as a backup by clicking on the “eye” icon, then selecting Download and storing the keys in a safe place offline.
Remember to click Save if this is your first time enabling OpenPGP for this inbox.
For security purposes it is recommended to disable autosaving of Drafts when composing emails from the Afterlogic webmail interface. Select Mail from the left navigation menu, and uncheck Allow autosave in Drafts to prevent unencrypted drafts from being saved on the server before you encrypt and send the email using PGP.
Note that PGP emails only support plain-text (not HTML formatting) and although attachments can be sent, they are not encrypted. The best way to share sensitive files is by using a private link to a cloud storage service such as NextCloud, which we also set up for our customers.
Sending & Receiving PGP Encrypted Email with Afterlogic and Mailcow
To send an encrypted email from Afterlogic, first have the intended recipient send you a copy of their PGP public key. If requested to provide a copy of your PGP public key, here is how you can do so from within Afterlogic.
Navigate to Settings > OpenPGP from the receiving account and click the “eye” icon beside the public key. You will see your PGP public key block displayed starting with -----BEGIN PGP PUBLIC KEY BLOCK----- in the modal window
 Click the Send button to compose a new message, with your public key attached, to the party who intends to send you encrypted email. Preferably, you should sign the body of this email with OpenPGP so that the other party can identify you.
 Once they receive your message (with public key attached), the party who who intends to send you encrypted email can import your public key into their Afterlogic webmail client – by simply clicking Import on the .asc attachment.
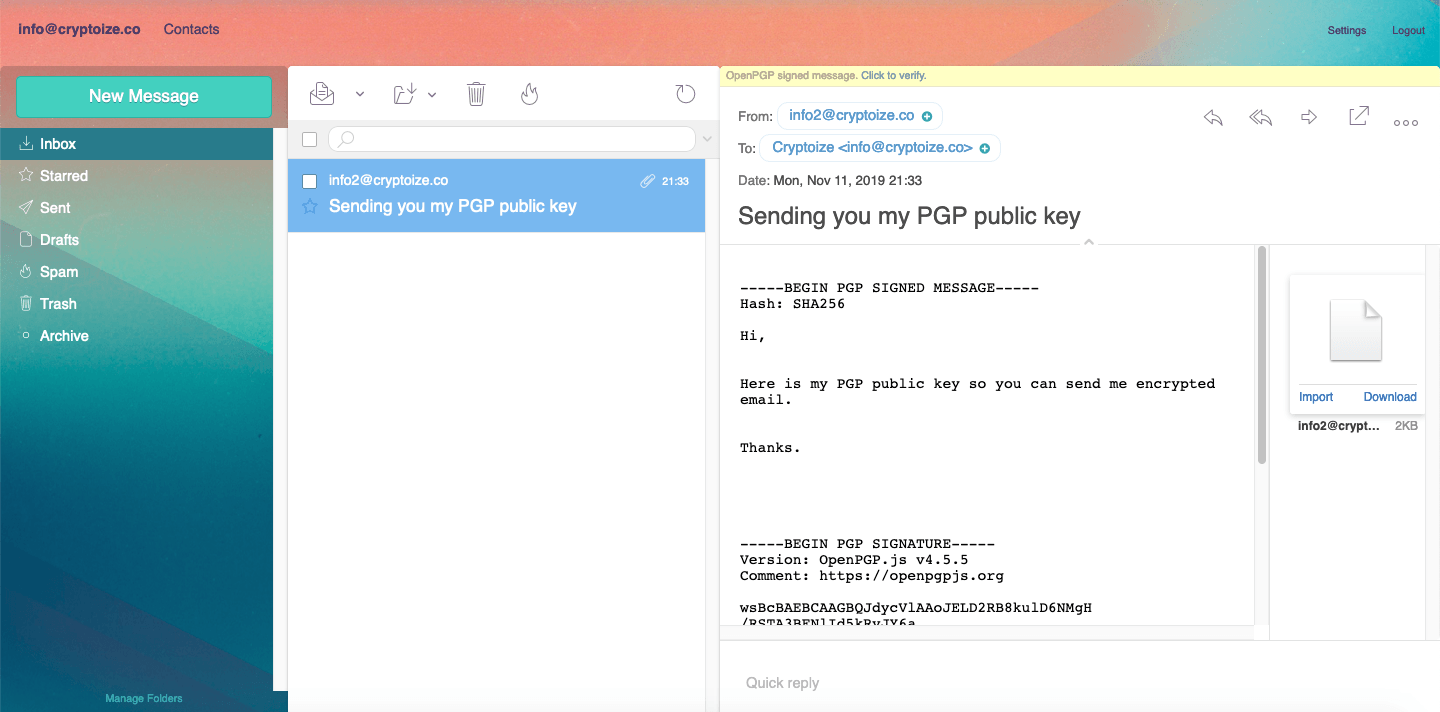 Once the public key is imported, they can send a PGP encrypted email in Afterlogic by simply clicking on the PGP Sign/Encrypt option after they are finished composing the body of their email.
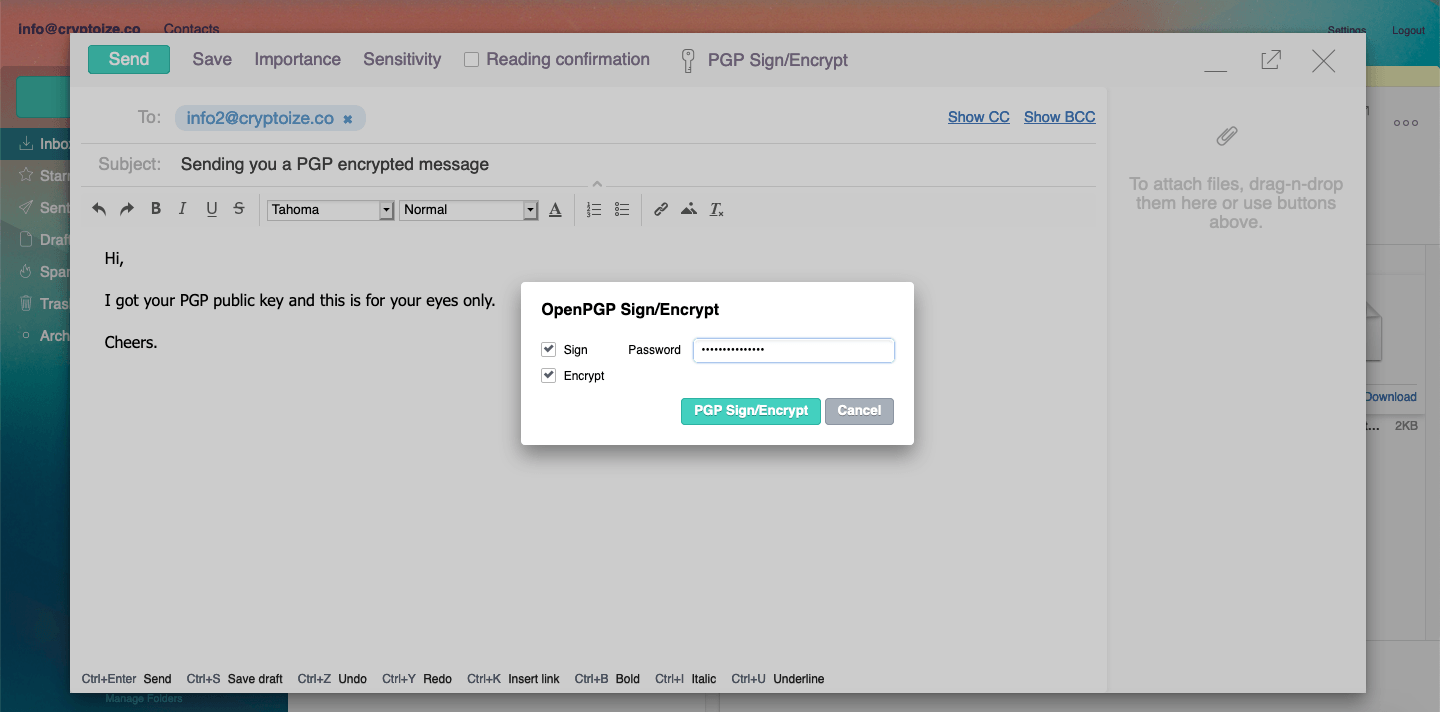
Afterlogic shows a warning that any rich text formatting will be stripped from the email prior to signing and/or encryption. Click OK to continue. Then ensure both Sign and Encrypt checkboxes are checked, then provide the passphrase you created when initially generating your PGP key, and click the PGP Sign/Encrypt button to confirm.
Before Encryption (on sender’s side)
 After Encryption (on sender’s side)
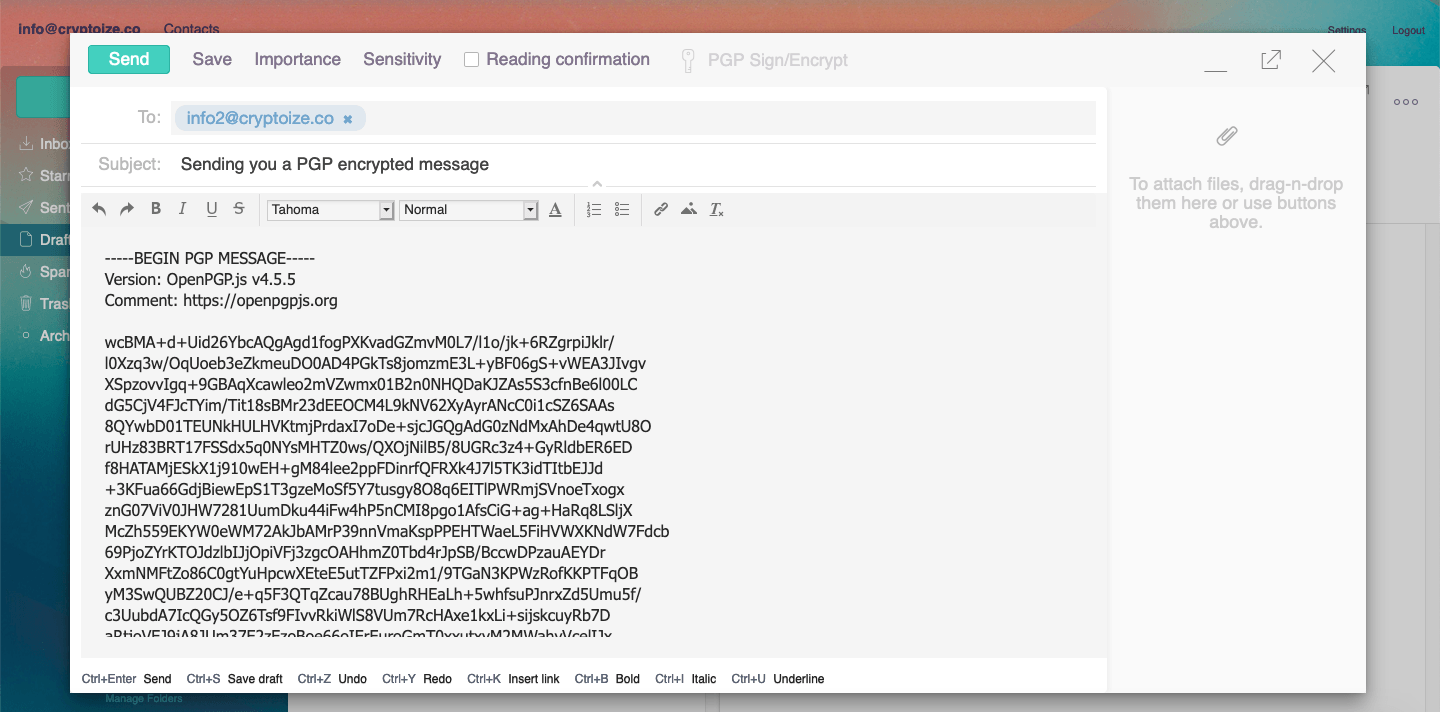 Click Send to send the PGP encrypted message off to its recipient.
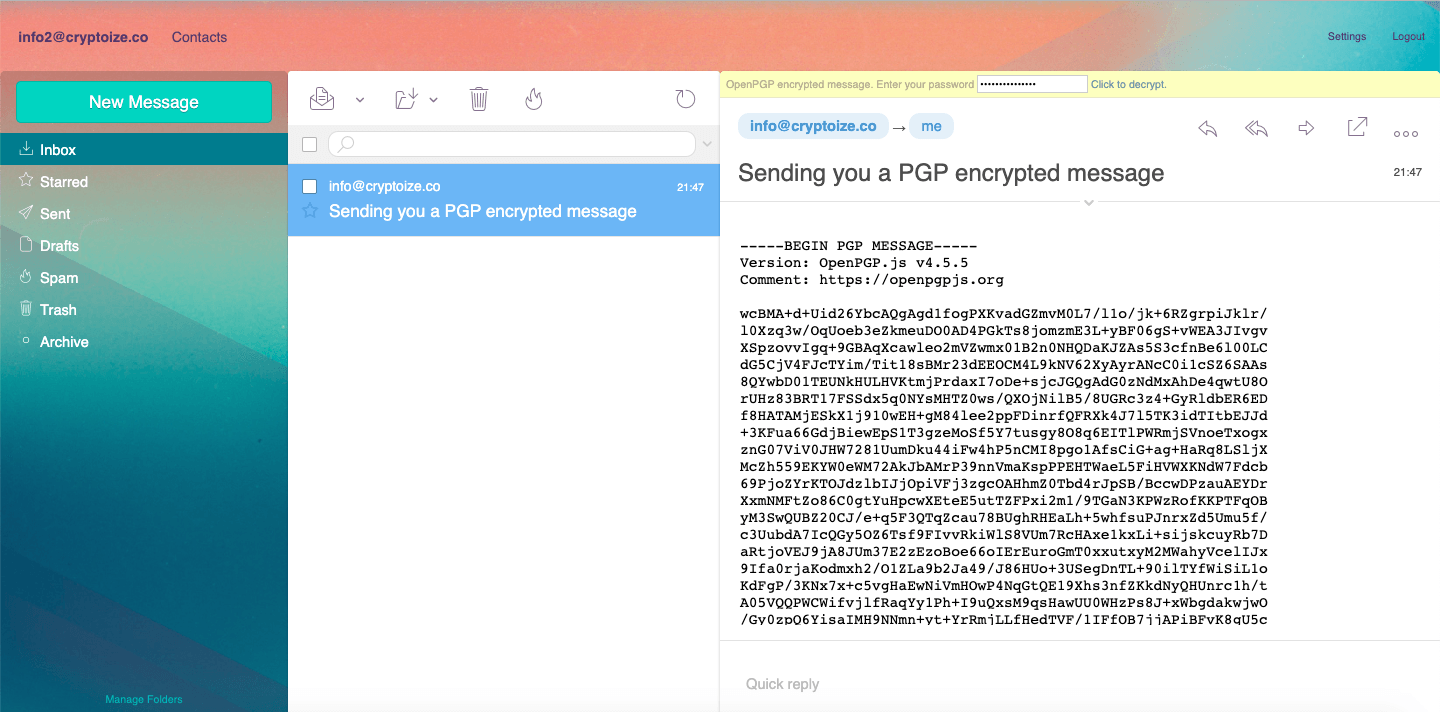
The recipient can decrypt the PGP message using their private key by entering the passphrase of their own private key in the yellow bar which appears above the encrypted email contents, then click Click to decrypt.
To be able to properly verify the digital signature of the PGP message as well, both parties should exchange their PGP public keys with one another and import it into their keychains.
Before Decryption (on recipient’s side)
 After Decryption (on recipient’s side)
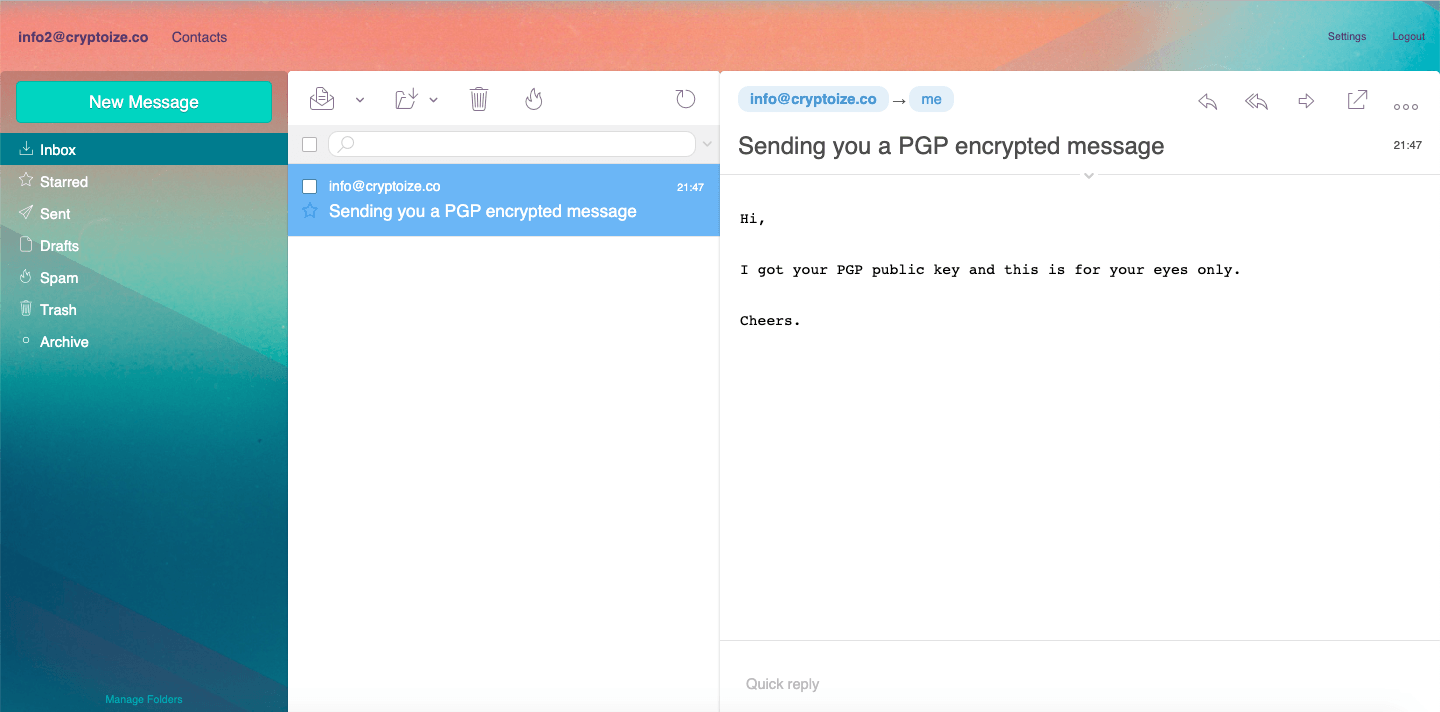 Notice that in the example above, the plain text (prior to encryption using the recipient’s public key) on the sender’s side completely matches the plain text (after decryption using the recipient’s private key) on the recipient’s side.
If you integrate Afterlogic WebMail with a Mailcow email server, you have a robust, self-hosted solution where users’ can exchange PGP encrypted email with each other, and with other PGP users outside the organization. The server maintains zero knowledge of the email’s contents as the encryption and decryption process happens completely on the client-side. Any mail exchangers involved in transmitting the email will simply see the PGP encrypted message block, meaning they also have zero knowledge of the contents of the email. If you would like to implement a self-hosted alternative to encrypted email services such as Protonmail or Tutanota, contact the Autoize Europe team about setting up a Mailcow server with Afterlogic WebMail.